

Can You Install eSIM Without Activating It? Best iPhone Setup Guide
Aug
Can you install eSIM without activating it on an iPhone? In many cases, yes. You can add the digital SIM before departure, keep the line turned off, and activate the travel plan after arriving. However, activation rules vary: some plans begin when installed, while others start only after connecting to a supported network. This guide explains eSIM installation versus activation, how to check whether a profile was added correctly, and how to configure cellular data, roaming, and Dual SIM settings. Follow these practical iPhone steps to avoid starting your plan too early or losing access to a single-use QR code.
What is an eSIM?
An eSIM is a digital SIM built into a compatible smartphone. It allows you to download and store a mobile plan without inserting a physical SIM card.
On an iPhone, an eSIM can provide:
- Mobile data
- A local or international phone number
- Voice calls
- SMS
- Access to a destination carrier
- Regional roaming across covered countries
The exact services depend on the purchased plan. Many travel eSIMs are data-only, while selected local plans may include calls, SMS, and a local number.
Apple currently supports general eSIM setup on the iPhone XS, iPhone XS Max, iPhone XR, and later models, subject to regional differences. The device must also be carrier-unlocked if the plan comes from a provider unrelated to the original carrier. Apple’s official eSIM setup guide explains the supported installation methods.
Before purchasing a travel eSIM, check three separate requirements:
- The exact iPhone model supports eSIM.
- The device is not locked to another carrier.
- The chosen plan covers the intended destination.
An iPhone can usually store eight or more eSIM profiles, although the number of lines that can remain active simultaneously depends on the model.
Highly rated 4.4/5.0 on Trustpilot
This rating belongs to the provider referenced in the competitor outline and should not be presented as a Twise rating unless it is independently verified for Twise at the time of publication.
When evaluating any travel connectivity provider, read recent reviews about installation, destination coverage, support response times, refunds, and connection quality. An overall score alone does not confirm how a specific plan will perform on your device or at your destination.
Save up to 50% on roaming
A travel eSIM may cost less than international roaming from a home carrier, but the saving is not universal.
Compare the total cost of:
- The travel eSIM
- Your carrier’s daily roaming pass
- A local physical SIM
- Public Wi-Fi or pocket Wi-Fi
- Calls and SMS not included in the eSIM
- Hotspot or top-up requirements
The strongest reason to install an eSIM before departure is not price alone. It is arrival readiness. You can access maps, hotel messages, ride-hailing apps, and transport information without searching for a SIM counter after landing.
Fast and reliable network
Connection quality depends on the underlying carrier, local coverage, congestion, device bands, network priority, and plan restrictions.
Before buying, check which network the eSIM uses and whether 4G or 5G access is included. A provider advertising broad national coverage does not guarantee identical performance inside underground stations, remote areas, mountains, or crowded event venues.
Installation vs. Activation
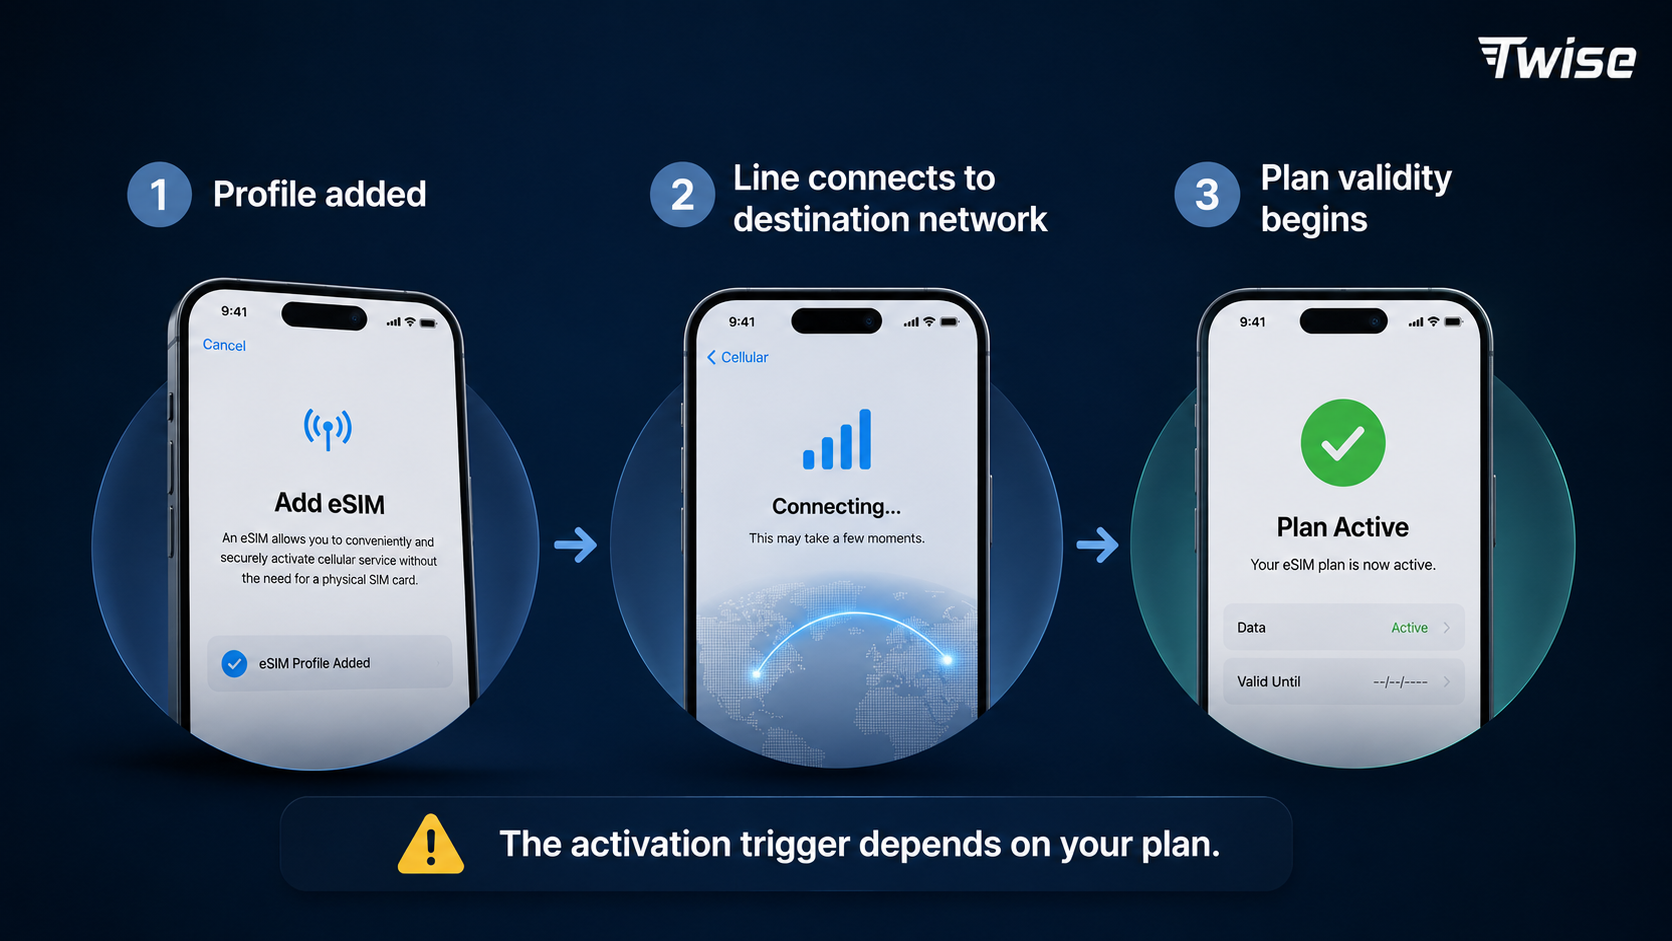
Installation means downloading and adding the eSIM profile to your iPhone. Activation means enabling that profile to register with a mobile network. Plan activation means the provider has started counting the plan’s validity period or allowance.
These events may occur at different times.
| Stage | What happens | Can it happen before travel? |
| Purchase | You receive the QR code or installation details | Yes |
| eSIM installation | The digital profile is downloaded to the iPhone | Usually |
| Line activation | The eSIM line is turned on and attempts to register | Yes, but it may not connect outside the coverage area |
| Network connection | The eSIM connects to a supported carrier | Usually at the destination |
| Plan activation | Validity begins according to provider rules | Depends on the plan |
| Data use | Apps begin using the travel line |
After configuration and connection |
The important distinction is that iOS may use the word “activate” while adding the cellular profile, even if the provider has not yet started the plan’s validity period. Travelers should therefore follow the plan-specific activation policy rather than interpreting one iPhone screen in isolation.
For example, a 10-day plan may start:
- Immediately after installation
- When the eSIM line is first turned on
- When it first connects to a supported network
- On a selected activation date
- After manual activation through the provider’s app or website
There is no single activation rule for every eSIM.
Is Installation Without Activation Possible?
Yes. Installation without starting the plan is possible when the provider defines activation as the first successful connection to a supported destination network or requires a separate activation step.
In that situation, you can normally:
- Install the eSIM over stable Wi-Fi.
- Label the new line.
- Keep the eSIM turned off.
- Continue using your home SIM.
- Turn on the travel line after arriving.
- Select it for cellular data.
- Enable data roaming if the provider requires it.
However, you should not install early if the product description says that validity begins upon installation. Scanning the QR code in your living room could start a 7-day or 15-day plan before the trip begins.
A safe pre-departure checklist is:
- Read the plan’s “activation policy” or “validity” section.
- Confirm whether installation starts the plan.
- Check the last date by which the eSIM must be installed.
- Save the order number and manual installation details.
- Use reliable Wi-Fi.
- Keep the QR code private.
- Do not delete the profile after installation.
- Contact support before experimenting if the instructions are unclear.
Travelers visiting the United States can compare USA eSIM options based on trip duration, local network, data allowance, and call requirements. Those traveling across several countries can review Europe eSIM plans and confirm whether one regional profile covers the complete itinerary.
Installation and Activation
To install an eSIM on an iPhone using a QR code:
- Connect the iPhone to stable Wi-Fi.
- Open Settings.
- Tap Cellular or Mobile Service.
- Select Add eSIM.
- Tap Use QR Code.
- Scan the provider’s QR code.
- Tap Continue.
- Select Add Cellular Plan or follow the onscreen prompt.
- Label the line as Travel, USA, Europe, or the destination name.
- Review the default voice and cellular data settings.
On iOS 17.4 or later, Apple also allows users to press and hold an eSIM QR code displayed in the default email app or browser and then select Add eSIM. Providers may alternatively support direct links, manual entry, carrier apps, or automatic carrier activation.
After installation, avoid selecting the travel eSIM for mobile data until you understand its activation rule. If the line is not needed yet, open its settings and switch Turn On This Line off.
- Settings > Cellular
- Add eSIM
- Use QR Code
- Add Cellular Plan
Blur the real QR code and any phone numbers.
Do not delete the eSIM if it displays “Activating,” “No Service,” or “Unable to Activate” while you are outside its coverage region. A destination-only plan may be installed correctly but unable to register until arrival.
eSIM Activation vs Plan Activation
eSIM activation and plan activation are not always the same.
eSIM activation is the technical process through which the iPhone adds and enables the carrier profile. Plan activation is the commercial event that starts the plan’s validity or allowance.
| Situation | Profile installed? | Line enabled? | Plan validity likely started? |
| QR code saved but not scanned | No | No | Usually no |
| Profile added and line turned off | Yes | No | Depends on provider |
| Line on but outside coverage area | Yes | Yes | Depends on provider |
| Connected to supported destination network | Yes | Yes | Often yes |
| Provider app shows “Activate now” completed | Yes | Usually | Usually yes |
Prepare Your Travel Connection
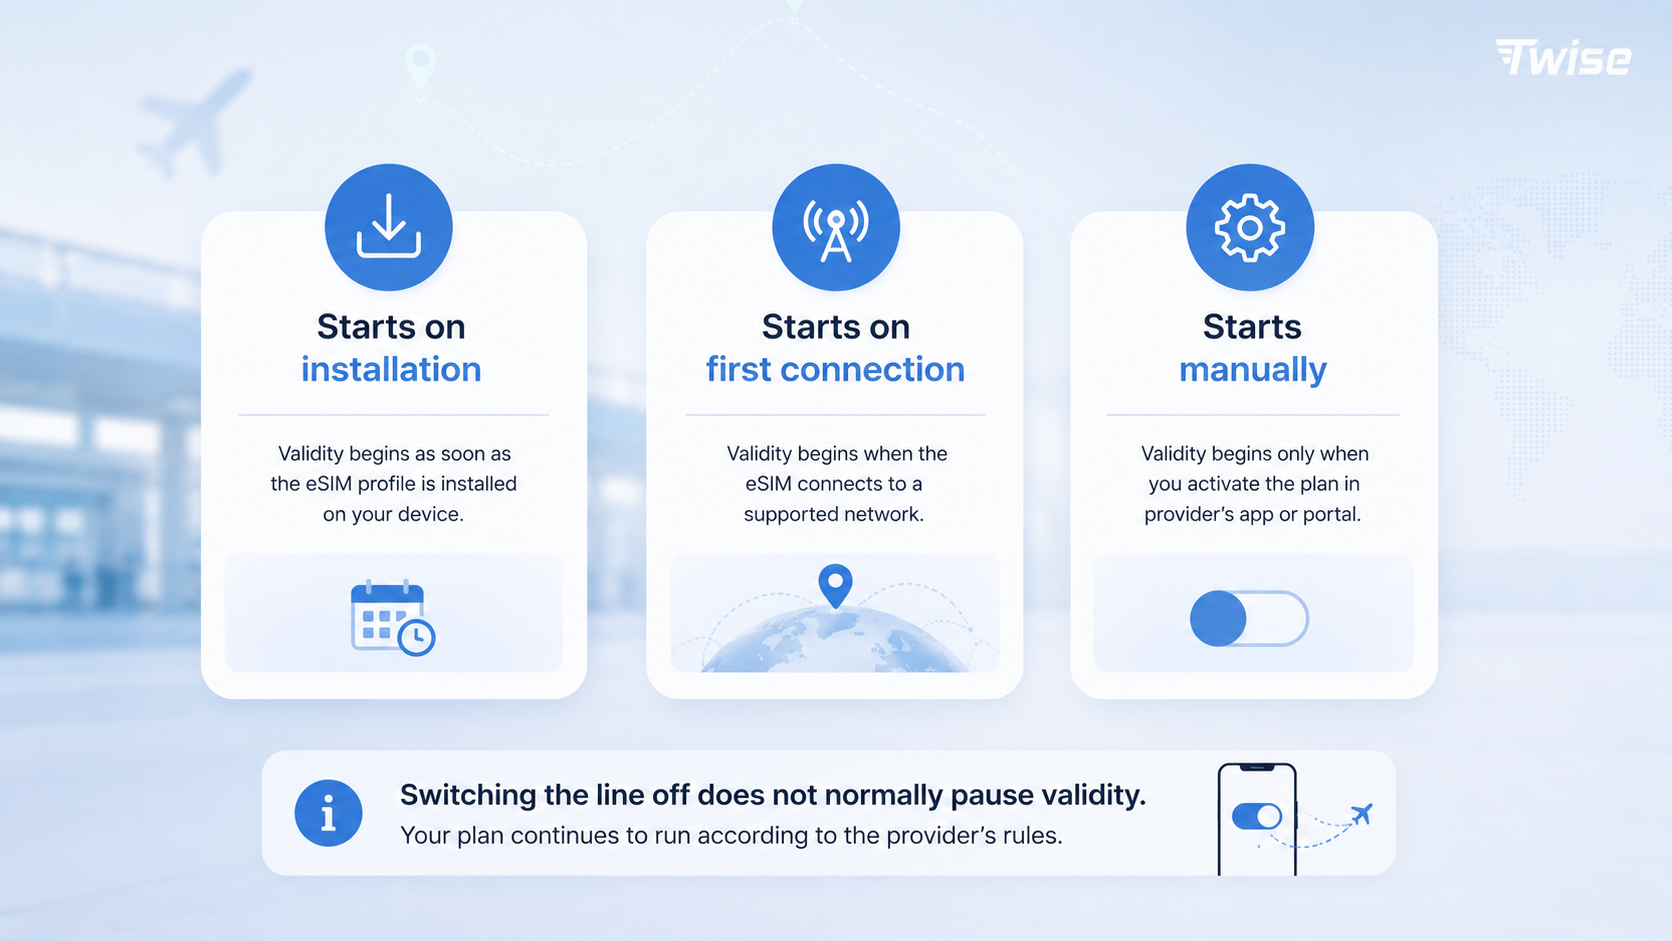
Never assume that turning the line off will pause an already activated plan. Once a validity period begins, disabling the eSIM usually does not stop the countdown.
The safest interpretation is:
- If the plan starts on installation, wait until close to departure.
- If it starts on first network connection, advance installation is generally suitable.
- If it starts through manual activation, install first and complete the activation step when needed.
- If the rule is unclear, ask the provider before scanning the QR code.
How to check if your eSIM was added
To verify that the eSIM profile was successfully added:
- Open Settings.
- Tap Cellular or Mobile Service.
- Look under SIMs.
- Find the label assigned to the new line.
- Tap the line to view its status and settings.
A successfully installed profile should appear in the SIM list even if it has no signal outside the destination.
Check the following:
- The correct line name appears.
- Turn On This Line is available.
- A carrier or plan label is shown.
- Network Selection appears where supported.
- Data Roaming can be configured.
- The ICCID is listed under Settings > General > About.
“No Service” before departure does not necessarily indicate installation failure. It may simply mean the plan cannot connect in your current country.
Signs that the eSIM may not have been added correctly include:
- The profile does not appear under SIMs.
- The QR code produced an invalid-code message.
- The iPhone reports that the code has already been used.
- The plan was issued for another device.
- The Add eSIM process stopped before completion.
- The provider confirms that no profile is assigned to the EID.
Do not repeatedly scan a single-use QR code. Contact support with the order number, iPhone model, iOS version, EID, and screenshots of the error. Avoid sending the full EID or QR code publicly.
Activating your eSIM plan
Activate the plan only according to the provider’s instructions. For a plan that starts on first connection, complete the final setup after landing:
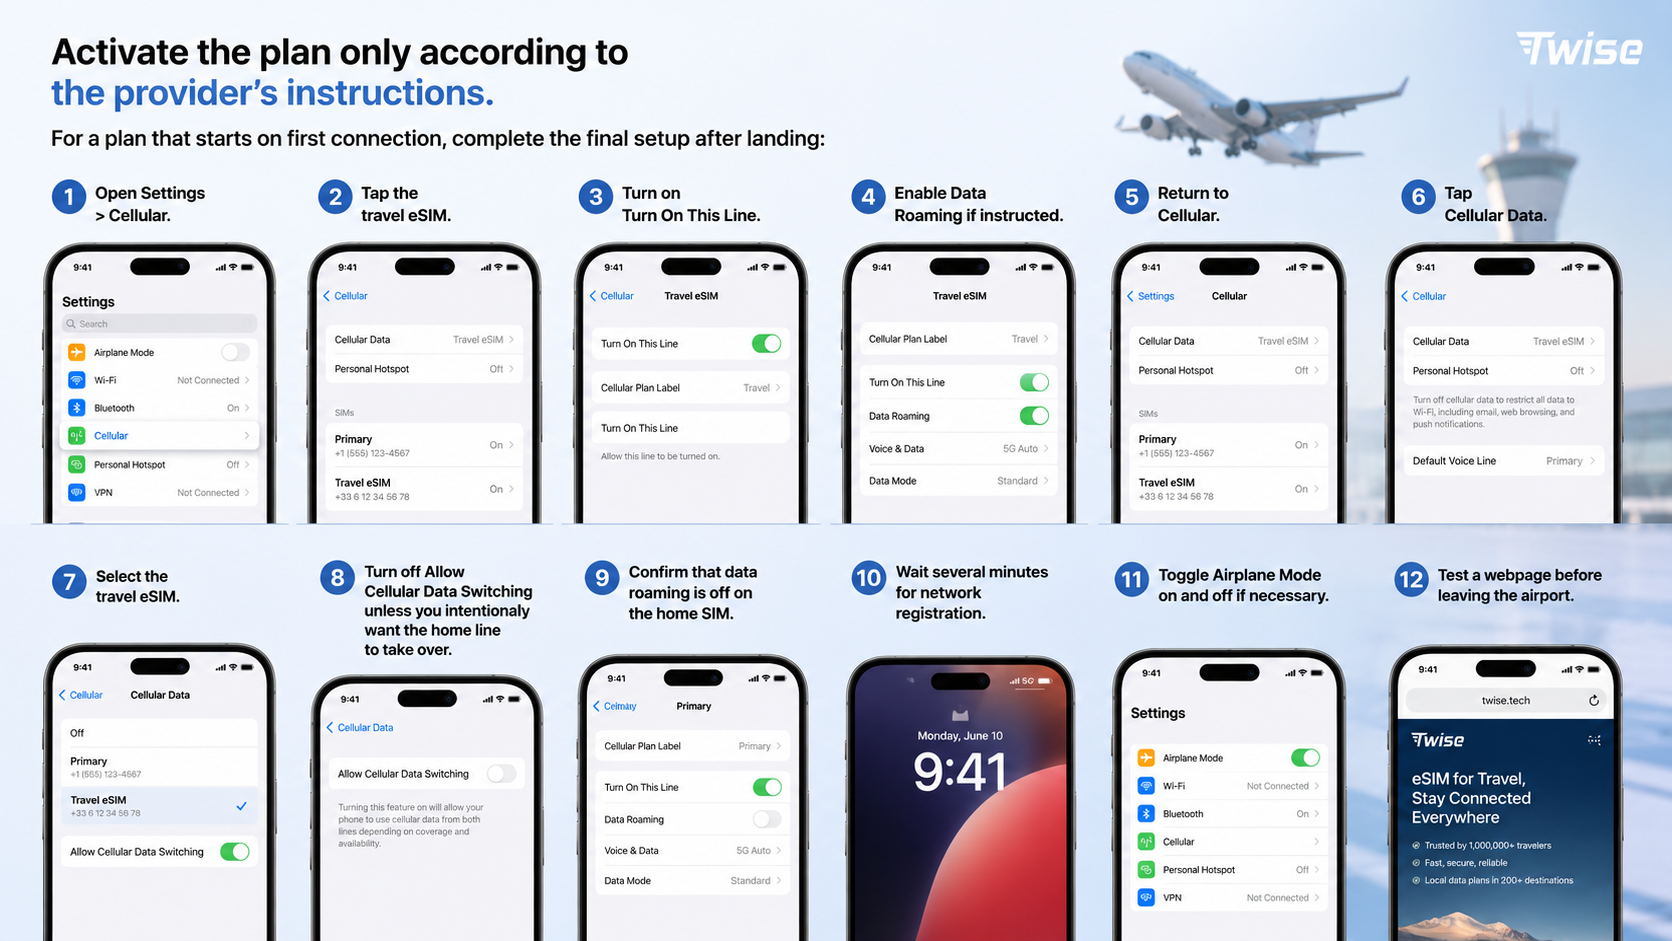
- Open Settings > Cellular.
- Tap the travel eSIM.
- Turn on Turn On This Line.
- Enable Data Roaming if instructed.
- Return to Cellular.
- Tap Cellular Data.
- Select the travel eSIM.
- Turn off Allow Cellular Data Switching unless you intentionally want the home line to take over.
- Confirm that data roaming is off on the home SIM.
- Wait several minutes for network registration.
- Toggle Airplane Mode on and off if necessary.
- Test a webpage before leaving the airport.
Apple notes that international plans may require Data Roaming to remain on. This should normally be enabled only for the travel line, while roaming remains disabled on the home line. See Apple’s guidance on managing cellular data and roaming settings.
If the eSIM does not connect:
- Restart the iPhone.
- Confirm the correct data line is selected.
- Check that the plan has not expired.
- Turn automatic network selection off and select a supported network if instructed.
- Verify the APN settings supplied by the provider.
- Check whether activation must be completed in an app.
- Move away from airport basements or underground transport areas.
- Contact the provider before deleting the profile.
The referenced Nomad installation article should be treated as guidance for Nomad products. Its activation rules do not automatically apply to Twise or another provider.
FAQs
