

Should Data Roaming Be On or Off? Best Travel eSIM Guide for iPhone and Android
Jul
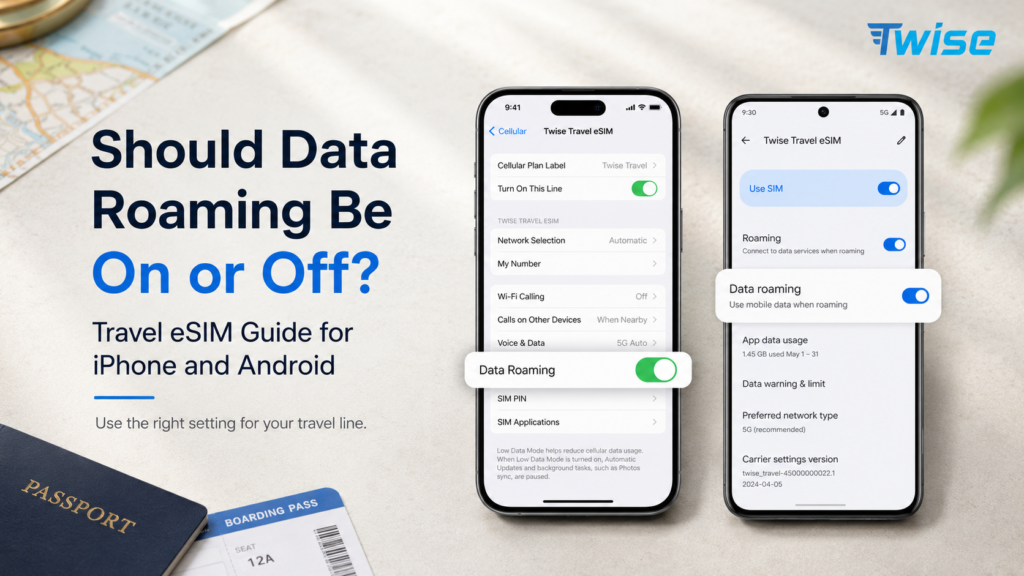
Should Data Roaming Be On or Off? For most travel plans, Data Roaming should be ON for your travel eSIM and OFF for your primary home SIM. Your travel or local line should also be selected as the phone’s mobile data line, so maps, ride apps, hotel messages, and browser searches do not accidentally use your home carrier. The anxiety behind this question is understandable: “roaming” sounds like automatic extra charges. In reality, the risk depends on which line is roaming. A prepaid travel eSIM may require roaming to reach local partner networks, while your home SIM can trigger expensive international rates if it is allowed to roam.
Quick Answer – Should Data Roaming Be On or Off?
The safest answer is not a single phone-wide setting. It is a line-by-line configuration: the travel or roaming eSIM usually needs Data Roaming on, the home SIM should have Data Roaming off, and only the travel/local line should be selected for mobile data. This prevents the most common mistake: installing the right eSIM but still routing traffic through the wrong SIM profile.
| SIM Line | Data Roaming | Mobile Data Line | Why |
| Travel/Roaming eSIM (Twise) | ON | Select as data line | Connects through local partner networks abroad; the plan allowance already covers this access. |
| Local eSIM (Twise USA/Japan/Korea) | Check setup guide — often OFF | Select as data line | Behaves more like a local carrier line, so the setting can differ by product. |
| Home SIM | OFF | Do not select | Prevents background app refresh, maps, cloud sync, and browser traffic from triggering home-carrier roaming. |
| Old/unused eSIM | OFF or delete | Do not select | Avoids confusion when the phone has multiple saved profiles with similar names. |
Data Roaming should usually be on for a roaming-based travel eSIM and off for your home SIM. Select the travel or local eSIM as the mobile data line, then turn off automatic data switching so your phone does not fall back to your home plan.
Local eSIM vs. Travel/Roaming eSIM – Why the Setting Is Different

This is the part most generic answers miss. An eSIM is only the delivery format. It does not automatically tell you whether the plan behaves like a local carrier line, a roaming-based travel plan, or a regional multi-country profile. That network design is what determines whether Data Roaming needs to be enabled.
Travel/roaming eSIMs connect through partner-network roaming agreements
A travel or regional plan often reaches the destination through roaming agreements with one or more partner carriers. In that case, the eSIM profile must be allowed to roam so it can attach to the contracted network. This does not mean your home SIM is allowed to roam. It means the prepaid travel line is using the network access it was designed to use.
Local eSIMs act more like domestic carrier lines
Local plans, such as USA local plans, Japan local plans, or Korea local plans, may behave like a domestic line inside that country. Some local profiles work with Data Roaming off, while others still have product-specific steps. The product setup guide is the source of truth; do not copy settings from a different destination just because both plans are digital SIMs.
Why “roaming” does not always mean surprise charges
Roaming is a network behavior, not a bill by itself. Charges appear when your carrier bills that behavior under your home plan. A prepaid Twise eSIM may include partner-network access in the purchased plan, while your primary SIM may bill every megabyte internationally. That is why the same toggle can be correct for one line and dangerous for another.
Featured snippet answer: A local eSIM does not always need Data Roaming on. Roaming-based travel eSIMs usually need it on, while local carrier-style eSIMs may work with it off. Follow the exact setup guide for the product, not a generic rule.
iPhone Setup – Correct Data Roaming Settings
On iPhone, the goal is to edit the correct line, choose the correct data line, and stop the phone from quietly switching back to your home carrier. Apple’s travel eSIM guidance explains that travelers can use a travel eSIM by itself or as a secondary line, and that when both lines are kept on, the primary line can still support some capabilities such as iMessage and FaceTime. Apple also warns that keeping both lines active can still involve home-line roaming fees depending on your setup and carrier plan.
Menu path
Go to Settings > Cellular, tap the specific line you want to edit, then open Cellular Data Options and review Data Roaming. If your phone uses “Mobile Data” instead of “Cellular,” the path is equivalent. Apple’s official iPhone travel eSIM guidance and cellular roaming guidance should be treated as the device-level reference.
Selecting the data line
- Open Settings > Cellular > Cellular Data.
- Choose your travel or local line as the data line.
- Return to the main Cellular screen and confirm your home SIM is not selected for mobile data.
- Rename the lines as “Home” and “Travel” if your iPhone allows it. Clear labels reduce mistakes during arrival.
Turn off Allow Cellular Data Switching for cost control
Allow Cellular Data Switching can be convenient, but it weakens cost control. If the travel line has weak coverage or a call is active on the other line, iPhone may use another available line for data. Travelers who want a strict no-surprise-bill setup should usually turn this off, then accept the small trade-off that data may pause during certain calls on the non-data line.
New for iOS 26
With iOS 26, Apple says an iPhone may automatically turn off a travel eSIM and turn the home SIM back on when you return home, depending on country or region. This is useful, but not something to trust blindly. Check the notification, confirm which line is active, and manually turn off old travel profiles if they are no longer needed.
When menu names differ
Use the Settings search bar and type “Data Roaming,” “Cellular Data,” or “SIMs.” iOS labels shift by region and version, but the principle does not change: select the line first, then edit the setting for that line.
Featured snippet answer: For a roaming-based travel eSIM on iPhone, turn Data Roaming on for the travel line, choose it under Cellular Data, and turn Allow Cellular Data Switching off. Keep Data Roaming off for the home SIM.
Android Setup – Correct Data Roaming Settings
Android guidance is less uniform because Samsung, Pixel, Xiaomi, Oppo, and carrier-customized phones place SIM controls in different menus. The safest workflow is to first select the travel line for mobile data, then confirm whether the roaming toggle you are editing is global or per-SIM. Do not toggle quickly from memory; read the line name shown on screen.
Samsung-style path
On many Samsung Galaxy phones, open Settings > Connections > SIM Manager to select the preferred SIM for mobile data. Then open Settings > Connections > Mobile Networks > Data Roaming. Samsung’s official SIM manager guidance explains that SIM Manager can control the default connection for calls, texts, and data, while Samsung’s data roaming guidance notes that steps can differ depending on carrier and device model.
Pixel-style path
On Google Pixel, open Settings > Network & Internet > SIMs, select the travel profile, and review Mobile Data and Roaming. Google’s Pixel eSIM guidance notes that eSIM profiles can be managed for international travel, while Pixel network settings explain that roaming lets a phone use another carrier network outside its carrier coverage area.
Confirm which line is being edited
Some Android devices show a roaming switch inside each SIM profile. Others show a more global-looking toggle after you select the preferred data SIM. If your phone has two active lines and the interface is unclear, turn mobile data off for the home SIM, select the travel line as data, restart the phone, and then verify internet access before opening high-data apps.
Use Settings search when paths shift
Search for “roaming,” “SIM manager,” “mobile network,” “preferred SIM,” or “data SIM.” Screenshots from another Android brand can be misleading because the same control can live in different menus.
Featured snippet answer: On Android, select the travel eSIM as the mobile data SIM, then enable roaming for that profile when the plan requires it. Samsung and Pixel use different menus, so confirm the active line before changing the toggle.
What About Your Home SIM? Calls, SMS, and OTP Codes
The home SIM is the emotional part of this setup. Travelers want to avoid roaming fees, but they also do not want to miss bank codes, delivery messages, airline alerts, or emergency calls. The safest answer depends on what your carrier charges for incoming texts, incoming calls, voicemail, and roaming registration.
When to keep it on
Keep your home SIM enabled if you need OTP or 2FA codes, bank alerts, airline messages sent to your regular number, or family access to your main line. In many plans, receiving SMS may be free, but this is not universal. Check your home carrier before departure rather than relying on assumptions from another country or traveler.
When to turn it off
Turn the home line off if your carrier charges for incoming calls, visual voicemail, call forwarding, roaming registration, or if the phone repeatedly searches for a network and drains battery. Turning the line off is the strongest protection against accidental calls and carrier-side activity, but it also blocks SMS codes.
Safer middle setup
- Home SIM: keep the line on only if you need SMS or calls; keep Data Roaming off.
- Travel line: select it for mobile data and apply the plan-specific roaming setting.
- Calls: avoid answering or returning home-number calls unless your carrier confirms the cost.
- Voicemail: disable forwarding or visual voicemail if your carrier bills roaming activity.
- Data switching: turn automatic switching off so the phone cannot quietly use the home plan.
Featured snippet answer: Yes, you can keep your home SIM on while using a travel eSIM. Keep Data Roaming off for the home line, select the travel line for mobile data, and avoid answering calls unless you know your carrier’s roaming charges.
Before You Fly – eSIM Setup Checklist
The best time to solve eSIM problems is before you need the eSIM. Most connection failures become stressful because the traveler is already abroad, has no stable Wi-Fi, and needs the internet to fix the internet. Use this sequential checklist instead of treating activation as an airport task.
| Timing | What to do | Why it matters |
| A few days before departure | Check that your phone is eSIM-compatible and carrier-unlocked. Buy the plan, read the setup guide, and install the profile while you still have strong Wi-Fi. | Compatibility, lock status, QR code delivery, and payment verification are easier to fix at home. |
| 24 hours before departure | Rename SIM lines, screenshot setup instructions, hotel address, booking confirmations, and support contacts. Turn off cloud photo backups and large app updates over cellular. | You reduce data waste and avoid searching email when airport Wi-Fi is weak. |
| Before takeoff | Keep the eSIM installed but follow the plan’s activation timing. Some plans start on installation; others start when they register abroad. | Turning it on too early can waste validity on some products. |
| After landing | Select the travel/local line for mobile data, apply the correct Data Roaming setting, toggle Airplane Mode, then test with a browser page before requesting rides or opening maps. | A browser test confirms real internet, not just signal bars. |
For the product-selection step, use the destination plan page rather than a generic setup memory. Start with Twise’s plan collection if you are still choosing between local and roaming-style options.
About Twise eSIM
Choosing the right roaming setting is easier when you know what type of eSIM you are using. Some travel eSIMs need Data Roaming ON because they connect through partner networks abroad. Twise focuses on local and regional eSIM plans that are designed around real travel use cases: maps, Waze, ride-hailing, hotel access, transit apps, OTP codes, and emergency searches from the moment you land.
With Twise, most plans are installed digitally before departure. There is no physical SIM card, no store visit, and no deposit or return process. Once your eSIM is installed, select it as your mobile data line and follow the setup guide for that specific plan, especially if the instructions say whether Data Roaming should be on or off.
Current Twise eSIM options:
USA local eSIM – Uses the T-Mobile or AT&T network, includes calls and SMS, and is suitable for road trips, rental cars, ride-hailing, hotel check-ins, and travelers who need a local number in the US.
Europe eSIM – Covers major European destinations with calls and SMS included, making it useful for multi-country trips where you need maps, train apps, hotel access, and cross-border connectivity.
Japan local eSIM – Connects through a local carrier network, suitable for train-heavy travel, station transfers, Google Maps, translation apps, and city navigation.
South Korea local eSIM – Provides local network access with strong urban and transit coverage, useful for subway navigation, maps, ride-hailing apps, hotel communication, and travel searches.
For navigation specifically, most travelers do not need unlimited data just to use Google Maps or Waze. However, if you use live traffic all day, ride-hailing frequently, translation apps, video calls, social media uploads, or hotspot sharing, check the plan’s data size and hotspot policy before purchasing.
The key rule is simple: keep Data Roaming OFF for your home SIM to avoid unwanted charges, then follow the setup instructions for your Twise eSIM and select it as your mobile data line before you start using travel apps abroad.
Troubleshooting – Signal but No Internet

“Full bars but no internet” is one of the most common travel eSIM support situations. The signal icon only proves the phone can see a mobile network. It does not prove that data is being routed through the correct line, that roaming is allowed for that profile, or that the APN and network selection are working.
Why this happens
- Wrong data line selected: the home SIM is still the data SIM even though the eSIM is installed.
- Data Roaming is off on a roaming-based travel plan that needs partner-network access.
- Automatic data switching is on, causing the phone to bounce between lines.
- APN settings are missing or not selected after installation.
- The phone is attached to a weak or incompatible network partner.
- You are in a true coverage dead zone, such as a basement, rural road, ferry route, tunnel, or dense building.
Fixes in the right order
| Step | Action | What it checks |
| 1 | Confirm the travel/local line is selected for mobile data. | Prevents the home SIM from silently handling data. |
| 2 | Check Data Roaming on the eSIM line if the product requires it. | Allows roaming-based profiles to attach to partner networks. |
| 3 | Turn off Allow Cellular Data Switching or equivalent automatic switching. | Stops fallback to the home plan. |
| 4 | Toggle Airplane Mode for 15-30 seconds, then turn it off. | Forces a fresh network registration. |
| 5 | Restart the phone. | Clears stalled network attachment and SIM-profile bugs. |
| 6 | Try manual network selection if the plan guide lists supported carriers. | Avoids a poor automatic network choice. |
| 7 | Check APN settings and select the APN listed in the setup guide. | Fixes signal-without-data issues caused by incomplete profile settings. |
| 8 | Move location and test a simple web page. | Separates device settings from a real coverage dead zone. |
When to contact support
Send screenshots that make the problem diagnosable: installed SIM list, active mobile data line, Data Roaming toggle for the eSIM line, APN screen, error message, current city or airport, and whether other apps work. A screenshot of the home screen with bars is not enough; support needs to know which line is carrying data.
Featured snippet answer: If a travel eSIM has signal but no internet, first check that the eSIM is selected as the data line, Data Roaming is enabled for that eSIM when required, and automatic data switching is off. Then restart, toggle Airplane Mode, check APN, and try manual network selection.
Data Roaming and Travel Apps – Why the Setup Matters in Practice
This setting is not just a technical toggle. It decides whether the apps that run a modern trip actually work at the moment you need them. The highest-risk moments are not when you are relaxing in a hotel room; they are when you are moving, verifying, paying, or trying to find someone.
Airport arrival
Arrival is the first live-data test. You may need to open a hotel address, check a transfer message, retrieve a QR code, translate an instruction, or confirm a ride pickup before airport Wi-Fi is stable. If your phone is still using the home SIM, a few background tasks can create roaming charges before you realize the data line is wrong.
Ride apps and meeting points
Uber, Lyft, Grab, Bolt, taxi apps, shuttle services, and private drivers need live location, driver messages, and changing pickup points. A one-time Wi-Fi connection inside the terminal does not help after you walk to the curb, train platform, or shuttle island. Test mobile data before requesting the ride, not after the driver starts waiting.
Hotel messaging and check-in
Hotels increasingly use apps, email links, WhatsApp, QR check-in, or door-code messages. Resort Wi-Fi may not work until after check-in, and small hotels may send last-minute instructions by chat. Keeping the eSIM as the active data line protects the first hour of the trip, when you are most likely to need the hotel address and least likely to have stable Wi-Fi.
Navigation, tickets, and payment verification
Offline maps are useful, but they do not receive platform changes, ride messages, new QR tickets, bank approvals, or gate changes. If your bank requires an app approval or OTP for a foreign transaction, the phone needs reliable data while the transaction is happening. That is why the correct data line and roaming setting should be checked before opening maps, mobile tickets, or banking apps.
For destination-specific planning, connect this guide with route guides that mention arrival apps, maps, hotel communication, and eSIM timing so readers understand the setting in a real trip context.
FAQs
You need calls and SMS if your trip involves calling hotels, restaurants, car rentals, or local services, or if you need SMS verification codes. If you only use WhatsApp, maps, and browsing, a data-only eSIM may be sufficient.
Among Twise options, UK O2 includes 500 EU call minutes and unlimited UK calls — the highest voice allowance. Lebara offers 200 minutes for shorter or more budget-focused trips.
Yes. Twise’s Orange Europe Local eSIM includes a French (+33) number with incoming and outgoing calls and SMS.
O2 and Vodafone direct plans cap EU roaming at 25GB when the UK allowance exceeds 25GB. Twise’s UK O2 Local eSIM includes 35GB specifically for EU use, which directly exceeds that cap.
Yes — all Twise plans are purchased online with instant QR delivery. No ID or KYC registration is required. Install before departure on Wi-Fi and activate on arrival.
For traveler-to-traveler communication, yes. For calling hotel landlines, car rental desks, local support numbers, or receiving SMS verification, no — those require a real phone number.
